Overconsumption of disposable plastic or aluminum packaging is endless waste. To remedy this, many resort to beeswax food wrap, a natural and reusable fabric made from beeswax for a sustainable conservation of totally eco-responsible food. Do you want to be part of the zero waste adventure with the family? Discover the tutorial on how to make your homemade bee wrap and all the secrets of this accessory.
What's a beeswax wrap ?
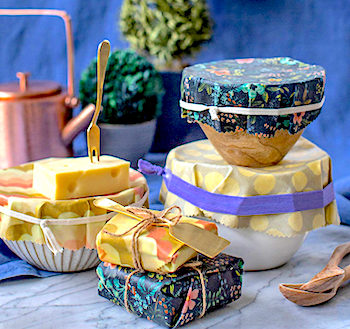
The beeswax wrap is a square of cotton coated with wax intended to pack healthily and keep food for a long time. It is odorless and represents a perfect ecological parade against aluminum rolls or plastic cling film. This food packaging has a variety of designs to meet user preferences. It is free of BPA (Bisphenol A), a substance harmful to health. In addition, the beeswax foodwrap pack has a thermoformable property, therefore in fact, it easily adapts to the shape of any type of container (bowls, glass jars , salad bowls…) thanks to the warmth of the hands. In addition, the wax allows it to adhere to itself to directly package your food.
In addition, it allows air to pass through and promotes long-lasting preservation of food from moisture. Although its composition may differ according to the manufacturers, the beeswax wrap is generally made up of elements such as:
- A square of organic coton fabric
- Wax to make the fabric waterproof
- Pine resin
- jojoba or sunflower oil to create suppleness.
Easy to make at home, it is therefore designed to remedy the pollution and waste caused by conventional food packaging. It is washable and stores food both in the open air, in the fridge or in the freezer. A great zero waste approach to avoid food waste.
How to make beeswax wraps?
The realization of your homemade ecological food wrap is simple as long as you gather the necessary elements, you will thus need:
- A not too thick square cotton fabric for a satisfactory result
- The beeswax or a vegetable carnauba wax for a vegan model
- Jojoba vegetable oil
- Preferably a notched chisel
- Two unbleached baking sheets
It should be noted that the realization of its wraps uses 2 different techniques, each just as effective as the other. It is indeed possible to opt for cooking in the oven (cast iron) or with an iron. An overview of the 2 methods will better guide your choice.
How to make a beeswax wrap in the oven?
Once the ingredients on hand, you can move on to the realization of your homemade beeswax food wrap:
- First, trace the reverse side of your fabric according to the measurements of the containers you want to wrap.
- Then, using the nothced chisel, cut it out in the shape drawn. In the absence of the notched chisel, a kitchen chisel can do the job, however be careful not to fray it.
- Preheat your oven at 80°
- Place a sheet of baking paper on the baking sheet before placing your fabric on it
- Generously sprinkle the wax drops
- Add a few droplets of jojoba oil
- After that, bake at 80°C for 3 or 4 minutes. You will see the wax melt.
- Take the baking sheet out of the oven and gently hold the coated cotton for 15 seconds
- In case the wax does not spread all over the fabric and cause unwanted holes, iron it in the oven after adding the wax. Otherwise, use a teaspoon to spread the melted wax on the uncoated parts. This second option is more economical.
- Finally, you can hang the fabric for a few seconds on a drying rack without clothespins to dry.
You can optionally rinse it with cold water before carefully storing it in your cupboard or at room temperature.
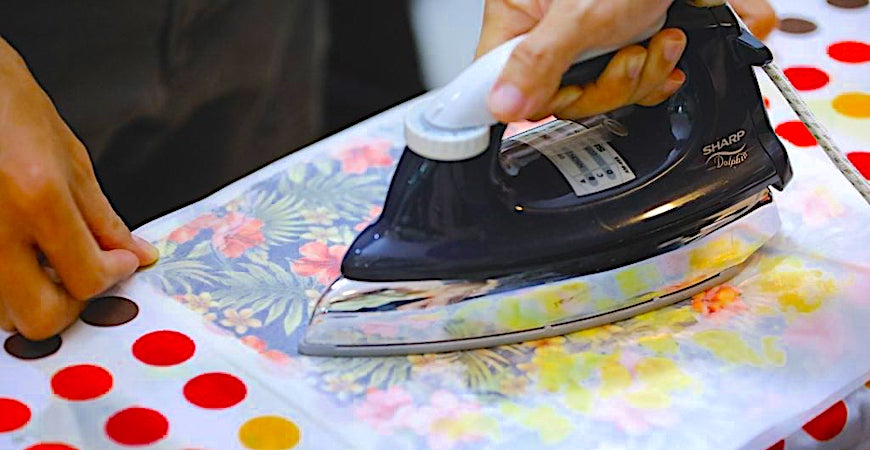
How to make beeswax wraps with an iron?
You will need the same ingredients as those needed in the tutorial for making homemade beeswax wraps in the oven . However, you will need an iron and an ironing board to complete this method. The procedure is just as simple:
- Draw the shape of the container on the reverse side of your fabric.
- Then cut it according to the drawn shape.
- Place a sheet of baking paper on the ironing board.
- Place the fabric on it
- Sprinkle it with wax
- Place the second sheet of baking paper on it
- Iron at low temperature until the wax has melted
- You will judge the homogeneity of the wax on the fabric through the baking paper
If the wax spread over the fabric is insufficient, sprinkle some additional drops on the holes before ironing it again. On the other hand, if you have a wax excess, place another square of fabric against the first one in the middle of the 2 sheets of non-greaseproof paper. After ironing, the excess wax can migrate onto the new fabric.
Where to find beeswax ?
You can buy your wax online on our zero waste shop. Beeswax can be purchased from an organic beekeeper or in a bulk grocery store. The Beeswax drops can thus be found easily.
The wax comes in the form of flakes, drops or ingots (block) that you can grate by hand with a cheese grater.
In the end, making your bee wrap is a simple and eco-responsible alternative to single use food packaging. We have been loudly presented with alternatives for many years for a long time, without there being any real change. Adoptiing beeswax food wrap represents a big step in reducing household waste in the family. As a reminder, the choice of purely natural elements for the realization of your bee wrap is capital. Its durability and your well-being are at stake. Happy creation to all of you!


